
1 Overview
I deal with multiple remote hosts everyday, sometimes, to better understand the current network situation clearly, I want to know the RTTs (Round-Trip Time) between the multiple hops quickly without run any commands against the target hosts manually again and again, which is painful and low efficient.
In this article, I’ll share my current setup, and walk through how to detect the network RTTs in the tmux sessions, then shows it in the status bar.
Screenshots:

1.1 Motivation
For my working environment, I will login to a dev host first (as a jump host), and from there, jump to other places like database, testing machines or production machines.
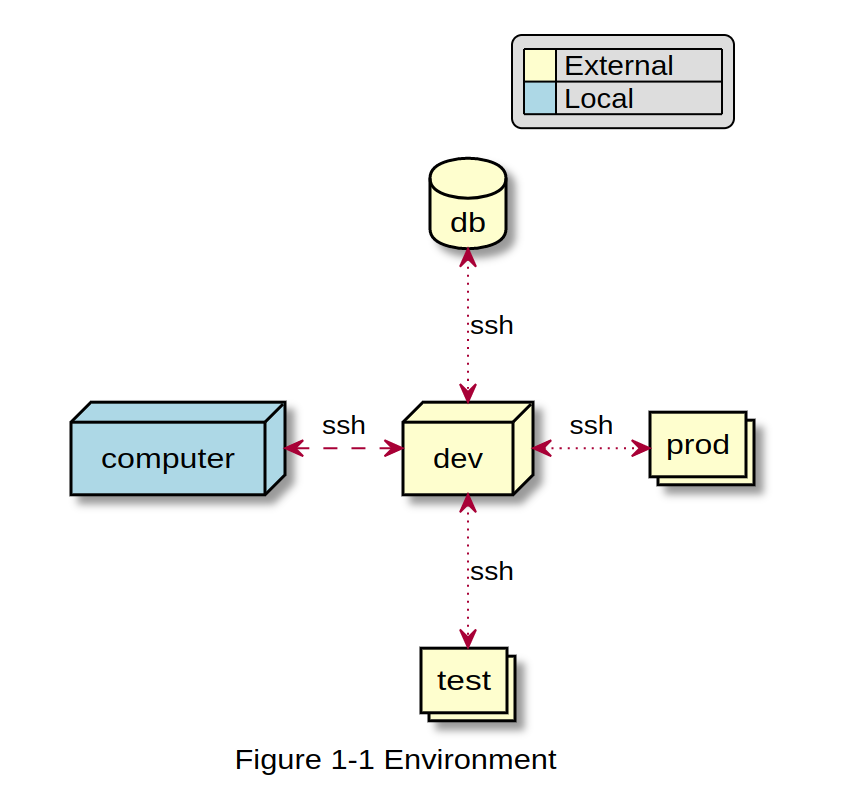
Sometimes, I also login to the machines across different regions, but a normal case is, after login to a host, then I realized that the network lag is quite noticeable, since I’m sensitive to the network lag, I will create a new session and run the ping command there.
But the process is painful and breaks my workflow, because I have to do the following steps:
- Create a new session
- Copy the
hostnameagain - Run the
pingcommand - Switch back
So, what if I can list RTT value in the status bar directly without manually run any commands separately, that will make the process smoothly. So that I want to know the below items:
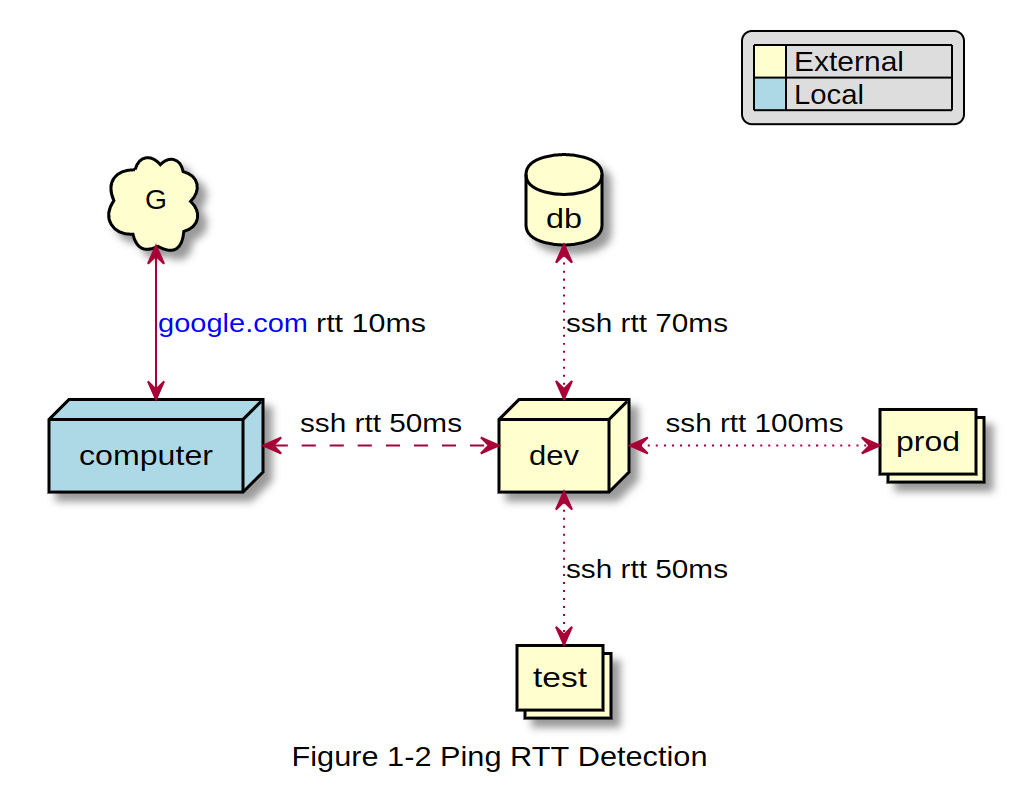
- What’s the ping rtt between my computer to a lighthouse website (e.g. google.com)
- What’s the ping rtt between my computer and the dev box
- What’s the ping rtt between the dev box and the remote production/database boxes
2 How to Detect RTT in Tmux
2.1 RTT Between Local to Lighthouse Server
This one is quite simple, a ping command will help us:
ping www.google.com -c 1 | tail -1 | cut -d "/" -f5
2.2 RTT Between Local to Remote Server
For this one, we have to figure out two problems:
- Which host we connected in the current tmux session?
- What’s the ping RTT between local to the target host?
The second one is the ping command in the previous section, and the only problem left is how to detect which host we connected to, then need to solve a few sub-problems:
- How to identify the current tmux session name?
- Which host we connected to in the current tmux session?
For the first one, we can filter the process by the current tmux’s tty name:
tmux display -p #{pane_tty}
Now, for the second one, we will use above tty name to filter the ssh process and extract the hostname from the command, then use ping command to detect the RTT, so the workflow will be like this:
ping ${hostname} -c 1 | tail -1 | cut -d "/" -f5

${hostname} = ps -af | grep ${tty_name} | grep ${hostname_pattern}
${hostname_pattern} = grep ssh | grep ${pattern}
Then we have:
ping -c 1 #(ps -af | grep "tmux display -p \"#{pane_tty}\" | cut -d \"/\" -f3,4 " | grep -v grep | grep -oP "ssh [a-zA-Z0-9.@\-]+" | cut -d " " -f2 | grep -oP "(?=@*)[\w\d.\-]*" | tail -1) | tail -1 | cut -d "/" -f5
3. Configuration
set -g status-bg 'colour235'
set -g status 'on'
set -g status-left-length '25'
set -g status-left '#(whoami) #[fg=colour121,bg=colour235] #(ping www.google.com -c 1 | tail -1 | cut -d "/" -f5)ms'
set -g status-right-length '140'
set -g status-right '#(ps -af | grep "tmux display -p \"#{pane_tty}\" | cut -d \"/\" -f3,4 " | grep -v grep | grep -oP "ssh [a-zA-Z0-9.@\-]+" | cut -d " " -f2) #[fg=colour232,bg=colour150] < #(ping -c 1 #(ps -af | grep "tmux display -p \"#{pane_tty}\" | cut -d \"/\" -f3,4 " | grep -v grep | grep -oP "ssh [a-zA-Z0-9.@\-]+" | cut -d " " -f2 | grep -oP "(?=@*)[\w\d.\-]*" | tail -1) | tail -1 | cut -d "/" -f5)'
The full configuration please refer to here.
3.1 Tips for the MacOS
The above grep hostname pattern only works in Linux (with GNU grep), due to the grep program in the MacOS is BSD grep which has different behavior in certain cases. To better align with the Linux distributions and make it works in the MacOS, we can install the GNU grep in the MacOS:
brew install grep

ln -s /usr/local/bin/ggrep /usr/local/bin/grep
Then reload or restart the tmux server will fix the MacOS issue.